Update time: January 15, 2025
If you’ve ever published a long page — a detailed guide, a documentation hub, or a landing page with a ton of content — you’ve probably asked yourself: are people actually reading all the way down, or are they bouncing after the first fold?
That’s where the Scroll Depth trigger comes in.
What Is the Scroll Depth Trigger?
The Scroll Depth trigger is a built-in trigger type in GTM that fires when a visitor scrolls past a specific point on a page. You define the thresholds — either as percentages of the page height (e.g., 25%, 50%, 75%) or as exact pixel values — and GTM fires the trigger when the user reaches each one.
It’s a simple concept, but it gives you something surprisingly useful: visibility into how far users actually engage with your content. Without it, you’re guessing. With it, you know.
A Real-World Example
To make this concrete, take my guide — Step-by-step deployment of Adobe Analytics with Adobe Launch. It’s a long page. The kind of page where you really want to know how far people scroll before they drop off.
Are they reading the entire walkthrough? Do they bail at the configuration section? Is the first half doing all the work while the second half is invisible? Without scroll depth tracking, you have no way to answer those questions.
That’s the problem the Scroll Depth trigger solves. Let me walk you through exactly how to set it up.
Step 1 : Enable Built-In Variables
GTM has built-in variables specifically for scroll depth, but they’re disabled by default. You need to flip them on first. If you’ve already done this, feel free to skip ahead.
In GTM , click「Variables」——「Configure」,Check these Built-In Variables of click:
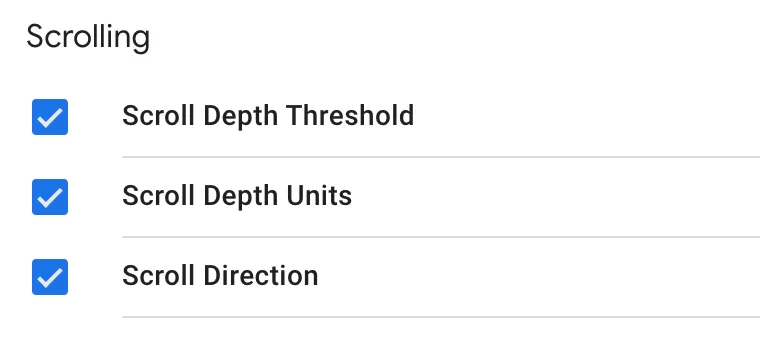
There are three built-in variables:
- Scroll Depth Threshold: Reads the gtm.scrollThreshold key from the dataLayer. A numeric value (0–100 for percentages, or the pixel value for pixel thresholds).
- Scroll Depth Units: Reads the gtm.scrollUnits key. Returns either ‘percent’ or ‘pixels’ depending on what you set as the threshold unit.
- Scroll Direction: Reads the gtm.scrollDirection key. Returns ‘vertical’ or ‘horizontal’.
Step 2 : Set Up the Trigger
In GTM,click「Triggers」——「New」——「Choose a trigger type to begin set-up」——「Scroll Depth」,name it “Scroll Depth- Specific Page”, and make the following settings:
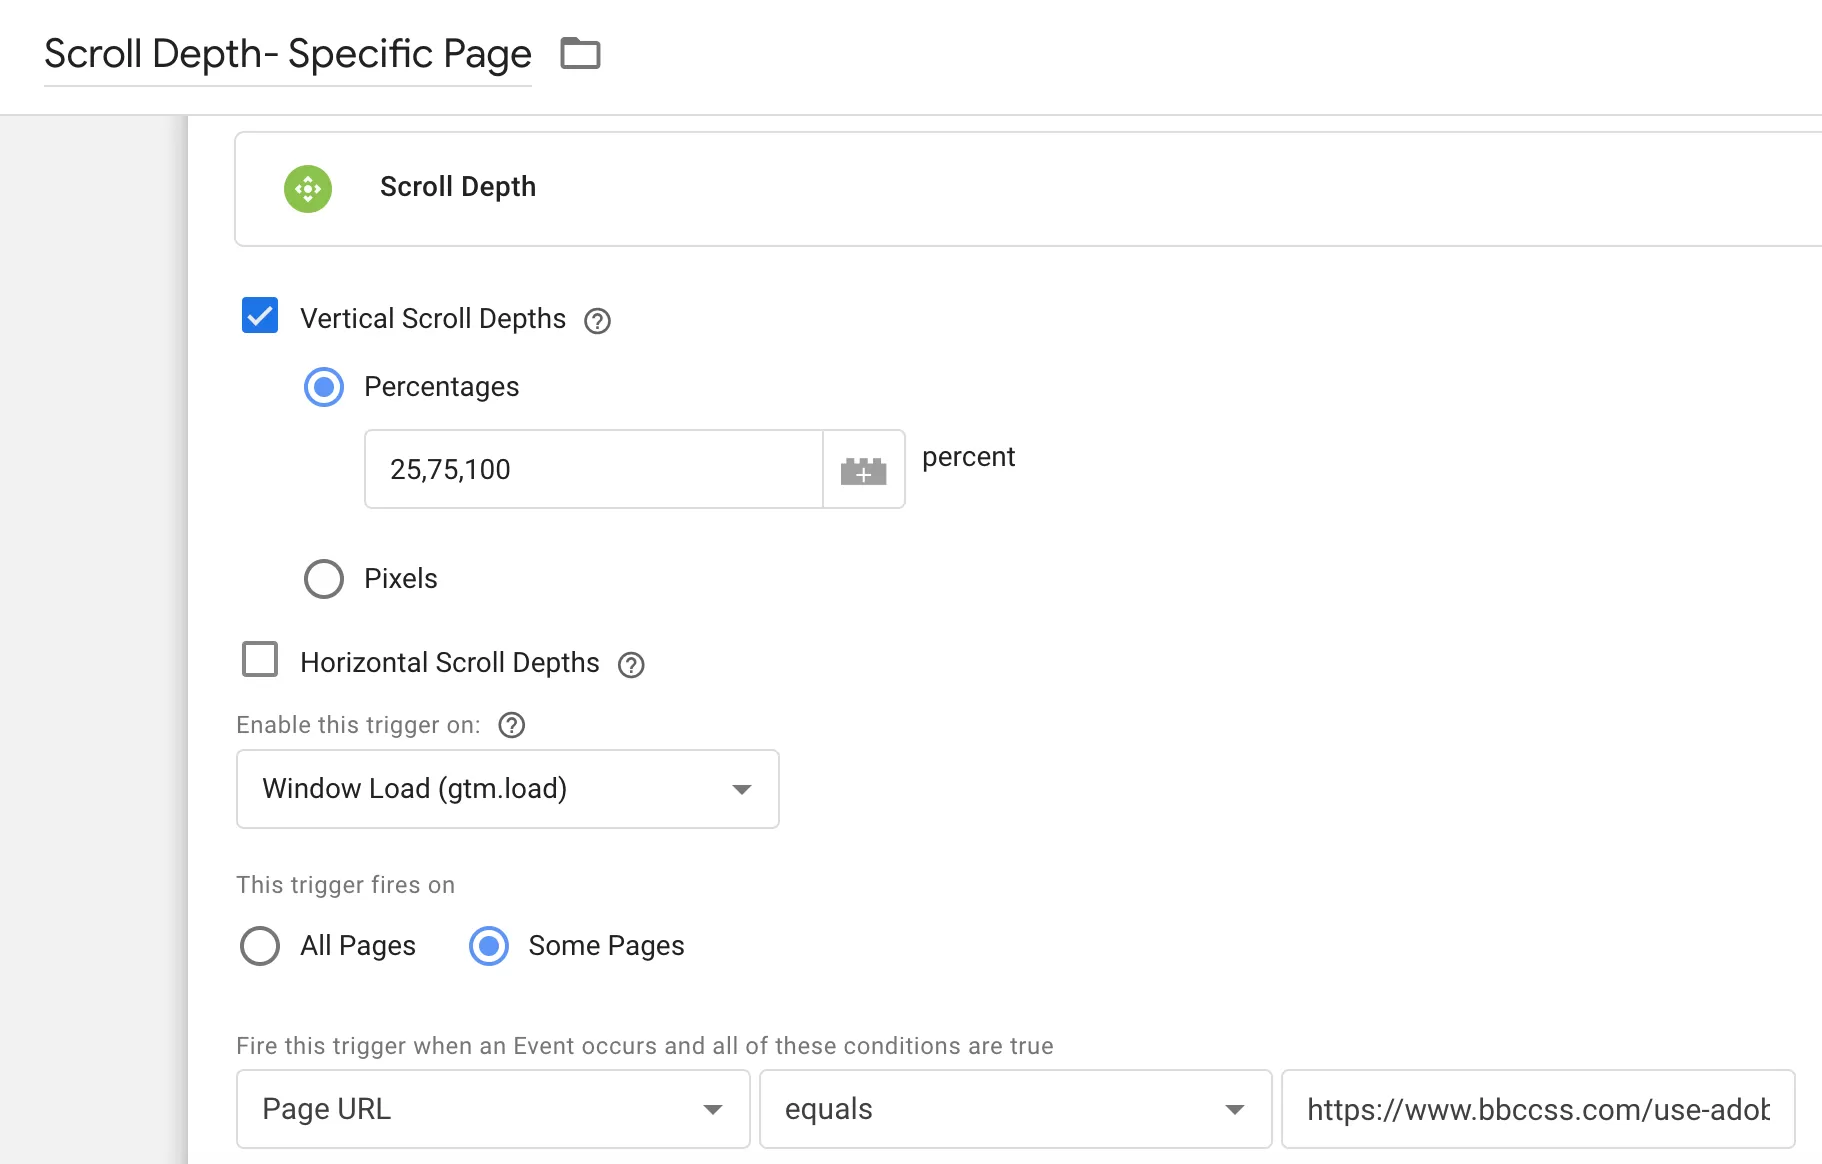
Here’s what each setting means:
- Vertical Scroll Depths:fires based on how far the user scrolls down the page. You’ve got two options:
- Percentages:just enter comma-separated numbers like
10, 50, 90. The trigger will fire when the user reaches 10%, 50%, and 90% of the page height. This is what I used for the Adobe Launch guide — I set thresholds at 25%, 50%, 75%, and 100% to get a clean picture of engagement. -
Pixels:enter the exact pixel height. Useful when you know exactly where your key content lives on the page, like a CTA button or a critical section.
- Percentages:just enter comma-separated numbers like
- Horizontal Scroll Depths :fires based on how far the user scrolls to the right. Less common, but handy for wide dashboards or horizontal layouts.
- Enable this trigger on:controls when GTM starts listening for scroll events. In most cases, the default is fine, but here’s what each option means:
- Container Load (gtm.js): starts monitoring as soon as possible.
- DOM Ready (gtm.dom): starts after the DOM is ready to be parsed.
- Window Load (gtm.load) (default): starts after all initial content has loaded. This is the safest bet for most setups.
- This trigger fires on:sets the page scope. If you only want scroll tracking on a specific page (like your long-form guide), add your page rule here. If you want site-wide scroll tracking, leave it empty.
One important thing to know: the trigger fires only once per threshold per page load. If the user scrolls back up and then down again, the trigger won’t re-fire. The page has to reload (or the user has to navigate to a new page) for the thresholds to reset.
Step 3 : Creating the GA4 Event Tag
Now let’s send that scroll data to GA4.
In GTM , click「Tags」——「New」——「Choose a tag type to begin set-up」——「Google Analytics: GA4 Event」,named “GA4-Event-Scroll Depth”,Here’s how I like to configure it:
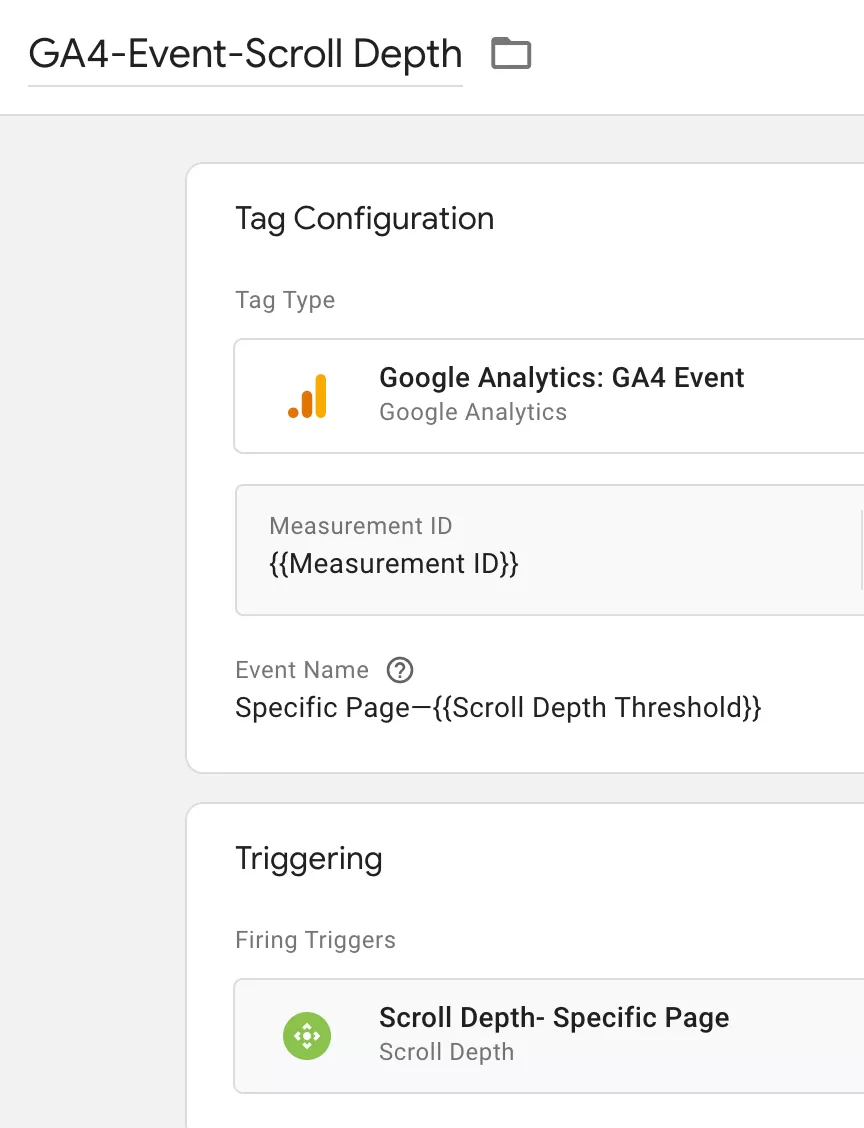
Set the event name as something descriptive. For example, I use a pattern like scroll_depth — {{Scroll Depth Threshold}}. If the trigger fires at 25%, the event name becomes scroll_depth — 25.
Alternatively, you can pass Scroll Depth Threshold as an event parameter and distinguish by parameter values instead. Both approaches work — pick whichever makes your reporting cleaner.
Step 4 : Preview and Publish
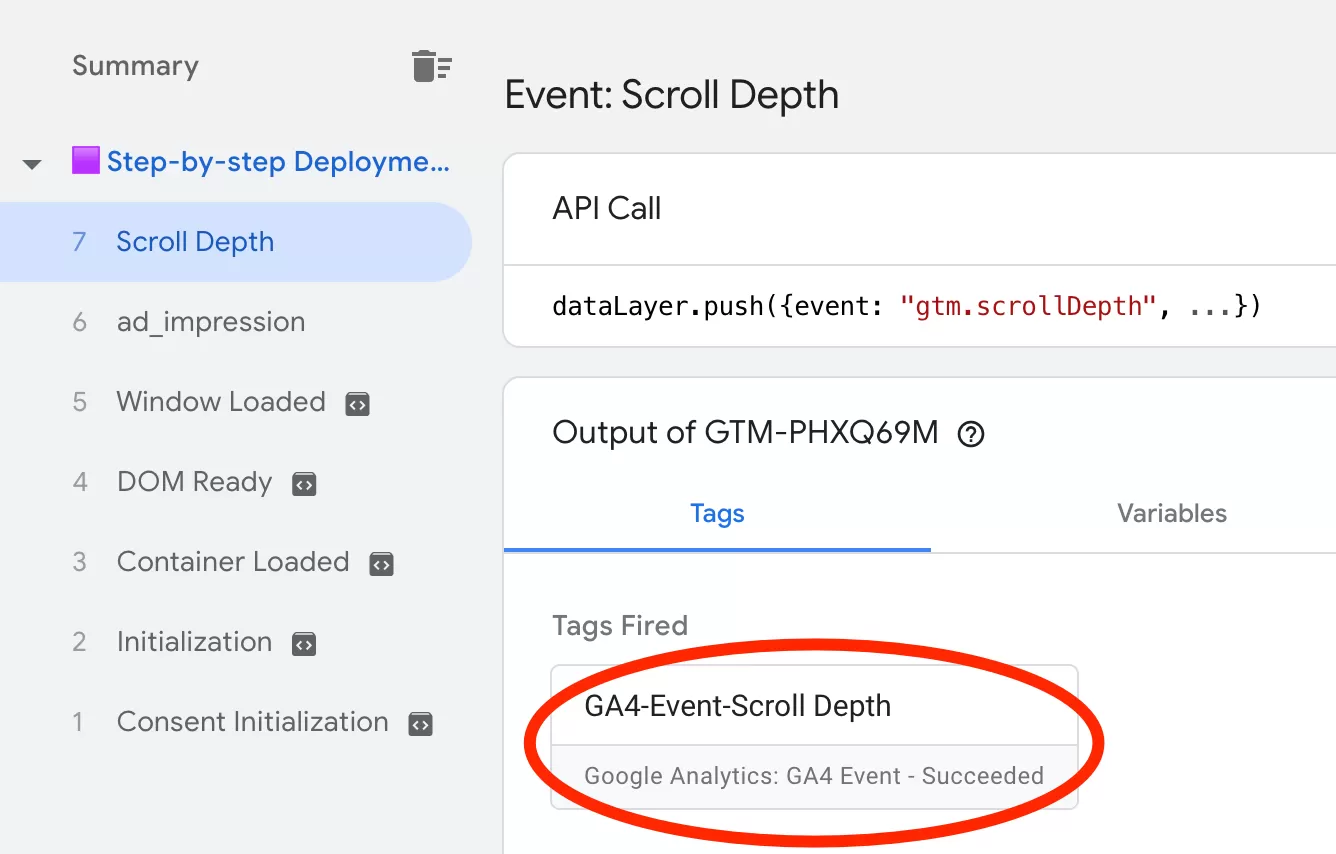
Click Preview in GTM, navigate to your form page, fill it out, and submit. In Tag Assistant, you should see:
Once everything works, create a new version and publish.
Step 5 : Verify Data in GA4 Reports
After publishing, give it about 24 hours — the typical delay before custom events appear in standard GA4 reports. Then find the event in Event Reports:
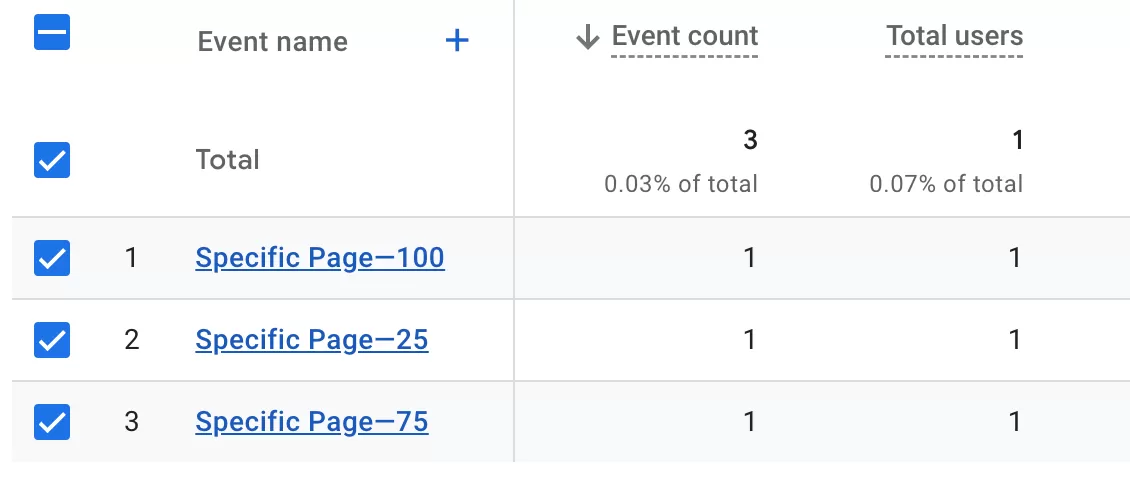
One thing I’ll mention: I’ve seen cases where the data doesn’t show up right away. Give it a full day. If it’s still missing after that, double-check that your GA4 tag is firing correctly in Preview mode.
Final Words
Scroll depth tracking is one of those small setups that gives you surprisingly useful insights — especially for long-form content, documentation, or product pages where engagement isn’t obvious from the surface.
I hope this guide helped you. If you ran into any issues setting this up, or if you’ve found a clever use case for scroll depth tracking that I didn’t mention here, feel free to drop a comment. I’d love to hear what you’re tracking and how it’s working for you.