Update time: March 19, 2026
This guide walks you through how to implement Adobe Analytics using Adobe Launch (Tags) step by step.
If you’re interested in a server-side setup, check out: Implementation Adobe Analytics Via Web SDK
Before getting started, make sure you have the necessary permissions for both Adobe Launch (Tags) and Adobe Analytics.
Let’s dive in.
Step 1: Create a Property in Adobe Launch
In Adobe Launch,click「Tags」——「New Property」, then set up as follows:
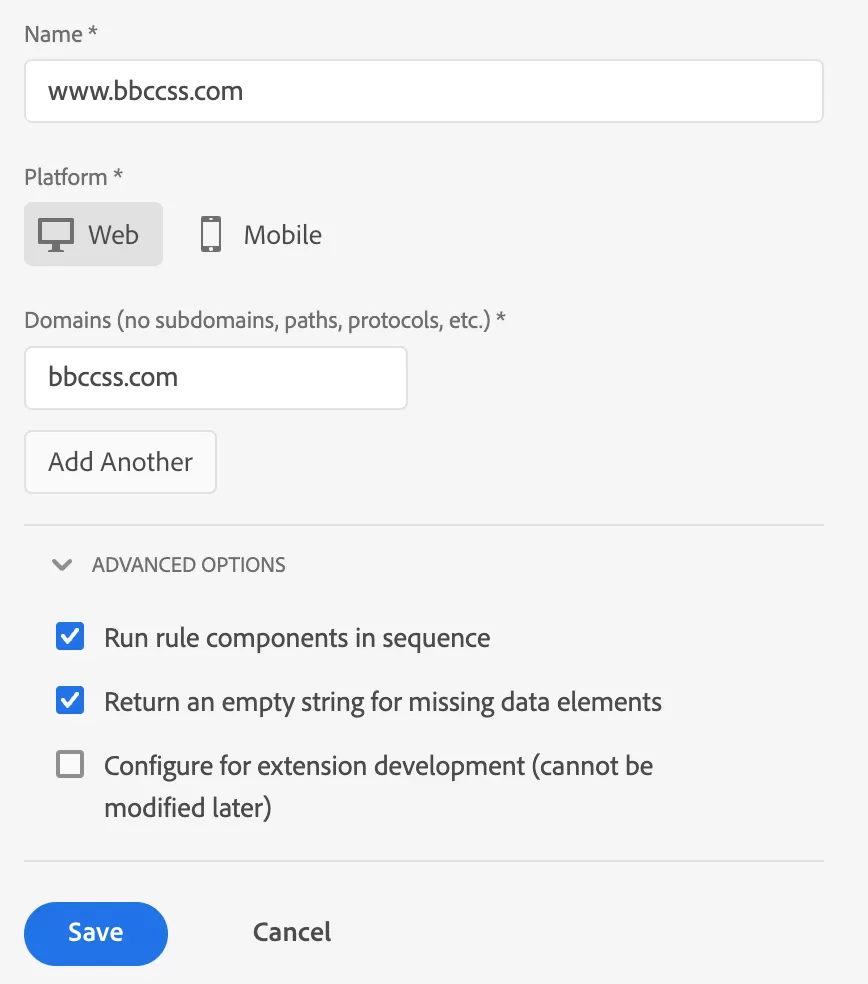
- Name:Usually your website name or domain (e.g., http://www.bbccss.com)
- Platform:Web for websites, Mobile for apps
- Domains:Enter your root domain only (no subdomains, paths, or protocols)
- ADVANCED OPTIONS
- Run rule components in sequence: Ensures rules execute in order (lower order = earlier execution)
- Return an empty string for missing data elements: Helps with debugging
- Configure for extension development (cannot be modified later): Only needed if you’re building custom extensions
Click Save.
Step 2: Install the Adobe Launch Library and Verify It
Next, install the Adobe Launch library on your website and verify that it’s working correctly.
Go to your newly created Property and click 「Environment」:

You’ll see three environment types:
- Development – used for implementation and testing during development
- Staging – used for QA and pre-production validation
- Production – the live environment for your website
Each Property can have one Production and one Staging environment, but you can create multiple Development environments.
Since we’re deploying to the live site, select Production. Click the icon on the right—this will open a panel with the embed code.

This is the Adobe Launch library you need to install. Place this code in the <head> section of all pages on your site.

The library won’t load until you publish a version in Adobe Launch. Installing the code on your server alone isn’t enough — you must publish a Launch library for it to take effect.
Open your browser’s Developer Tools and check the Network tab:

- Status 200 → The library loaded successfully
- Status 404 → The library failed to load
If you see a 404, it may be due to CDN propagation. Adobe Launch uses Akamai CDN, so updates can take a short time to propagate. Open the library URL in a new tab and refresh until it loads. Then refresh your site — it should return 200.
Step 3: Create a Report Suite
In Adobe Analytics, Click 「Admin」——「Report Suite Manager」——「Create New」——「Report Suite」to set up a new report suite.

Configure the basic settings — Report Suite ID, Name, Time Zone, and Currency — based on your business requirements.
Once created, make a note of the Report Suite ID. You’ll need it in the next step.
Step 4: Install Adobe Analytics Extension
In Adobe Launch,click「Extensions」——「Catalog」,then search for “Adobe Analytics”

Click 「install」, and once the installation is complete, open the Adobe Analytics extension settings.

There are quite a few configuration options — don’t worry, we’ll go through each section.
LIBRARY MANAGEMENT
This section controls how the Adobe Analytics library is managed and where your data is sent.
For most implementations, you’ll use the default option: “Manage the library for me.”
Next, configure the Report Suite ID, which determines where your data will be collected.
In our example, we created a Report Suite with the ID BBCCSS in the previous step. Enter this value in the Production Report Suites field, like this:

If you’re using separate environments (e.g., Development and Staging), you should also enter the corresponding Report Suite IDs for those environments.
There are two optional configurations below:
- Use Activity Map:Enables click tracking on links and provides a visual click heatmap to understand which elements users engage with most.
- Make tracker globally accessible:Exposes the s object on the global window scope so other scripts can reference it directly. Useful for specific cases like s.doPlugins or custom scripts, but generally not recommended to rely on heavily unless you have a clear use case.
GENERAL

- Character Set: UTF-8 (standard for modern websites)
- Currency Code: Select your business currency (USD, EUR, JPY, etc.)
- Tracking Server & SSL Tracking Server:Leave blank to use Adobe’s default third-party domains (e.g., sc.omtrdc.net, 2o7.net). For a first-party CNAME setup, work with Adobe first, then update these fields.
- Enable EU compliance for Adobe Analytics: Leave unchecked unless you have specific compliance requirements
- Collect high entropy user-agent client hints: Enable this. Client Hints are gradually replacing the traditional User-Agent string as a more reliable, privacy-friendly source of device information.
GLOBAL VARIABLES
The main settings are eVars and Props, and basic page information (ADDITIONAL SETTINGS).
Please ignore eVars and Props for now; our focus is on ADDITIONAL SETTINGS.
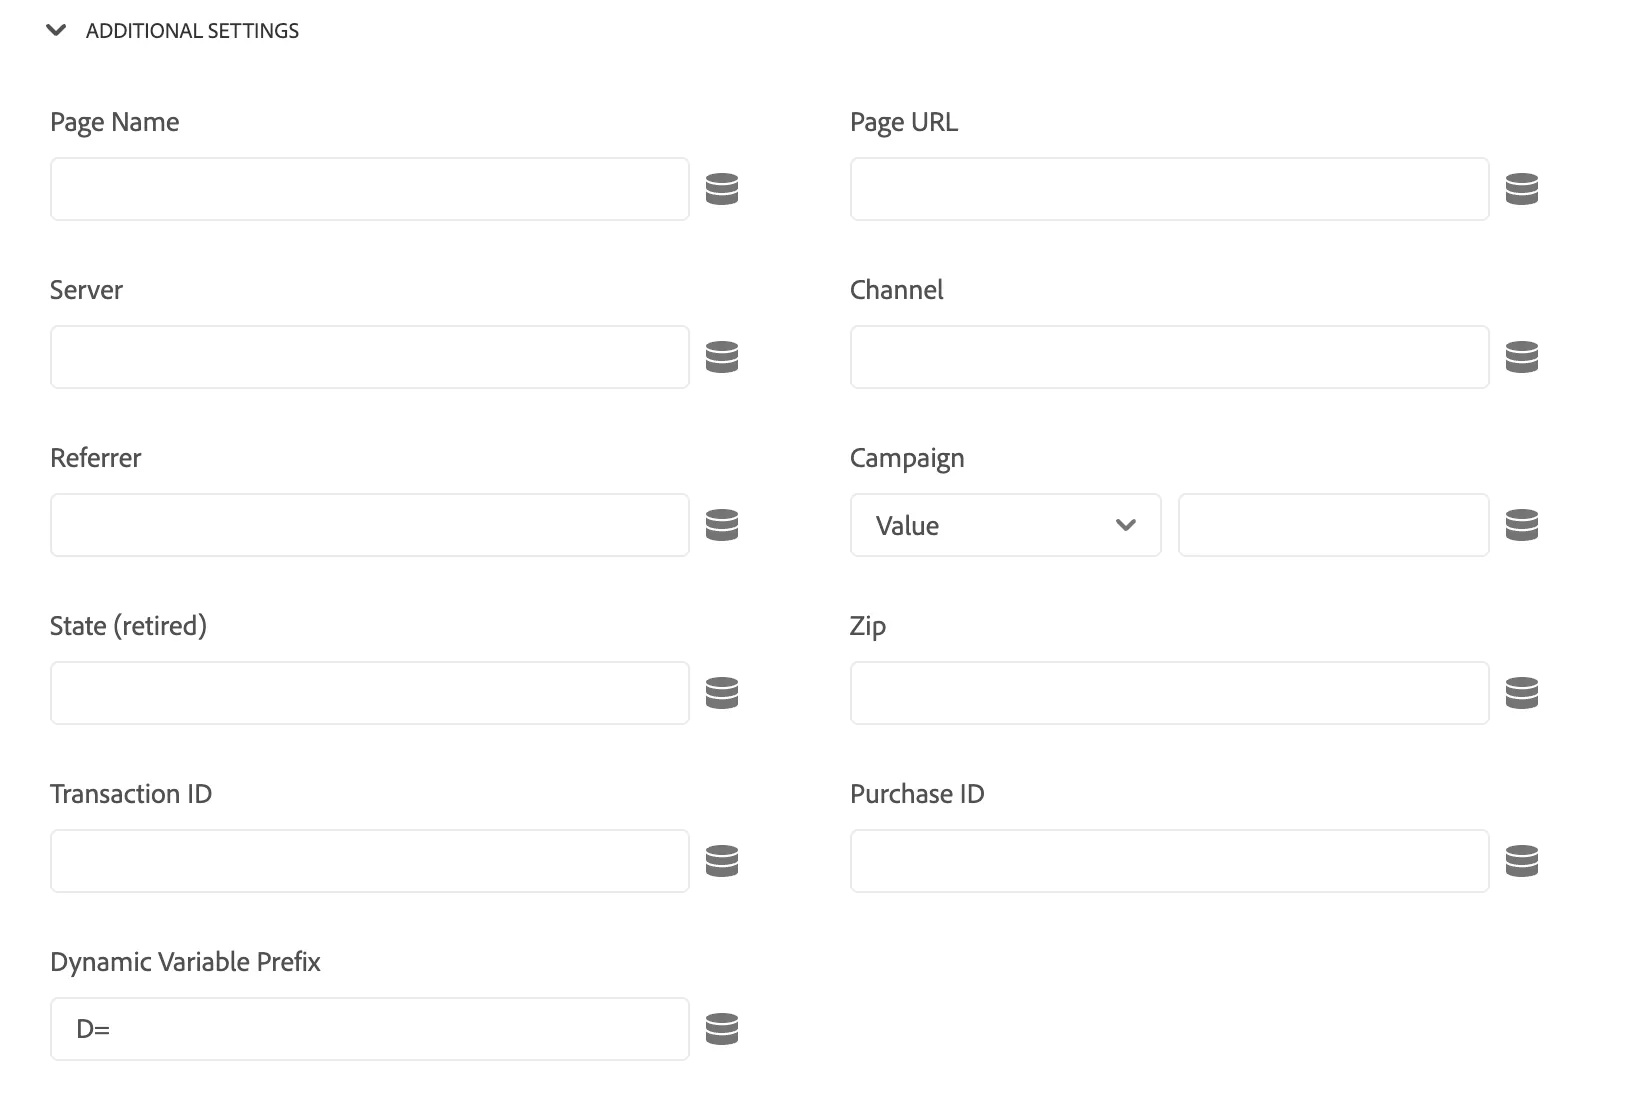
These are all basic tracking variables. Let’s use Page Name as an example to walk through the setup process.
First, create the supporting data elements. In Adobe Launch,click「 Data Elements」——「Add Data Element」,then set up as follows:
|
Name
|
Extension
|
DataElement Type
|
Check
|
StorageDuration
|
Attribute
|
|---|---|---|---|---|---|
|
PageURL
|
Core
|
PageInfo
|
Forcelowercasevalue
|
PageView
|
URL
|
|
Server
|
Core
|
PageInfo
|
Forcelowercasevalue
|
PageView
|
Hostname
|
|
Channel
|
Core
|
VisitorBehavior
|
Forcelowercasevalue
|
Session
|
TrafficSource
|
|
Referral
|
Core
|
PageInfo
|
Forcelowercasevalue
|
PageView
|
Referral
|
Once your data elements are ready, go back to the Adobe Analytics extension settings.

Click the Data Element picker icon (the little square/tag icon) next to each field to select the appropriate data element.

The final effect is as follows:

Alternatively, you can manually reference a data element by typing its name in this format: %Data Element Name%. Both methods work the same way.
Both methods work the same way.
LINK TRACKING

- Enable ClickMap:Turns on Activity Map data collection (enabled by default)
- Track download links:Automatically tracks download link clicks (enabled by default)
- Track outbound links:Tracks clicks on links that navigate users away from your site
- Keep URL Parameters: Preserves query string parameters in tracked URLs
The default settings are sufficient for most implementations.
COOKIES
For this setup, we only configure:
- cookieLifetime = Default

- Visitor ID : Stores a custom unique visitor identifier. Adobe does not recommend using this — use the Experience Cloud Identity Service instead.
- Visitor Namespace: Deprecated. Use
trackingServerinstead. - Domain Periods: Determines where Analytics cookies (
s_cc,s_sq) are set by counting periods in the domain. Also used by some plug-ins to determine the cookie domain. - First-party Domain Periods:Helps AppMeasurement set cookies correctly when the domain has an extra suffix level. Default is 2 — no change needed for example.com or http://www.example.com. Set to 3 for domains like example.co.uk or http://www.example.co.jp.
- cookieLifetime: Defines how long Analytics cookies persist. Directly impacts visitor counts and attribution:
- Default : 2 years.
- None : AppMeasurement does not set cookies.
- Session : Cookie expires at the end of the visitor’s session.
- Seconds : Cookies expire after a specified number of seconds
- Write secure cookies: Ensures cookies are only transmitted over HTTPS
CONFIGURE TRACKER USING CUSTOM CODE
If you want to add custom JavaScript, you can do it here. Before doing so, make sure “Make tracker globally accessible” is enabled in Library Management. No additional configuration is needed at this stage.

ADOBE AUDIENCE MANAGER
This section is for AAM setup. Since we’re not using Adobe Audience Manager, leave it unset.

Finally, save your changes in the Adobe Analytics Extension.
Step 4: Configure Rules
In Adobe Launch,click 「Rules」——「Add Rule」,named “Adobe Analytics Base Tracking Code”.
EVENTS
Configure the event that triggers the rule — typically DOM Ready or Page Load, depending on when you want tracking to fire.

ACTIONS
Action 1 :Map the data elements you created earlier (Page Name, Server, Channel, Referral, etc.) to their corresponding Analytics variables.

Action 2 :Use s.t() to fire the beacon as a page view.

The final effect after the rules are set:

The rule setup should now include a page-view trigger and the variables you want to populate on every page.
Step 6: Publish & Test
Publishing can feel a bit cumbersome due to the complexity of Adobe Launch permissions. To get started, click Add New Library.:

Give your library a clear name, select the appropriate development environment, and then click Add All Changed Resources.

Once everything is set, click Save & Build for Development in the top-right corner. You should now see the library listed under the Development environment.

Next, visit your website and use theAdobe Experience Platform Debugger to validate your implementation.

If everything looks good, you can also verify the data in Adobe Analytics Real-Time reports.

We are done.
Done
You now have a working Adobe Analytics implementation via Adobe Launch. From here, you can layer on additional rules for specific events (form submissions, video interactions, scroll tracking, e-commerce) as your tracking requirements grow.