Updated: January 12, 2025
If you’ve ever tried tracking clicks on a specific element in GA4 — a button, an icon, a navigation link — you know that GTM’s built-in click triggers don’t always make it easy. Especially when the element doesn’t have a clean ID or unique class that GTM can latch onto.
That’s where jQuery comes in.
In this guide, I’ll show you how to implement custom event tracking using jQuery — capturing clicks with CSS selectors, pushing them into the data layer, and sending them to GA4 via GTM. No backend code changes needed.
Why Use jQuery for Event Tracking?
This approach is useful when:
- You cannot modify backend code — the HTML is generated server-side and you don’t have access
- You need to track clicks on specific UI elements that don’t have reliable IDs
- You want flexible event tracking based on CSS selectors — targeting elements by class, attribute, or position
Think of it as giving yourself a safety net. Instead of hoping GTM’s auto-event variables can figure out which element was clicked, you explicitly tell jQuery: “when this specific element is clicked, do this.”
How It Works
Here’s the tracking flow at a high level:
User Click → jQuery Listener → dataLayer.push → GTM Trigger → GA4 Event
jQuery listens for click events on elements matching a specific CSS selector. When the click happens, we push a custom event into the dataLayer. GTM picks it up with a Custom Event Trigger and fires a GA4 Event tag.
The beauty of this approach is precision. You’re not relying on GTM’s guesswork — you’re telling it exactly what to listen for.
Use Case Example
Let’s walk through a real scenario. Say we want to track clicks on the home icon on a website. The icon is part of a navigation bar and doesn’t have a unique ID, but it does have a CSS class we can target.

Step 1: Identify the Element to Track
Right-click the element you want to track and select Inspect. Look at the HTML structure and find a selector that uniquely identifies it.
In this example, the class `g-mono` can be used as the selector.
A quick best practice here: use a stable and unique class or attribute as your selector. Avoid classes that change between deployments or are shared by multiple unrelated elements. If the class gets changed by a developer later, your tracking breaks silently — and nobody wants t
Step 2: Create jQuery Click Listener in GTM
Now let’s set up the jQuery click listener. We’ll do this using a Custom HTML tag in GTM.
In GTM , click「Tags」——「New」——「Choose a tags type to begin setup…」——「Custom HTML」,Name it “HTML-Listen Home Icon Click”, and make the following settings: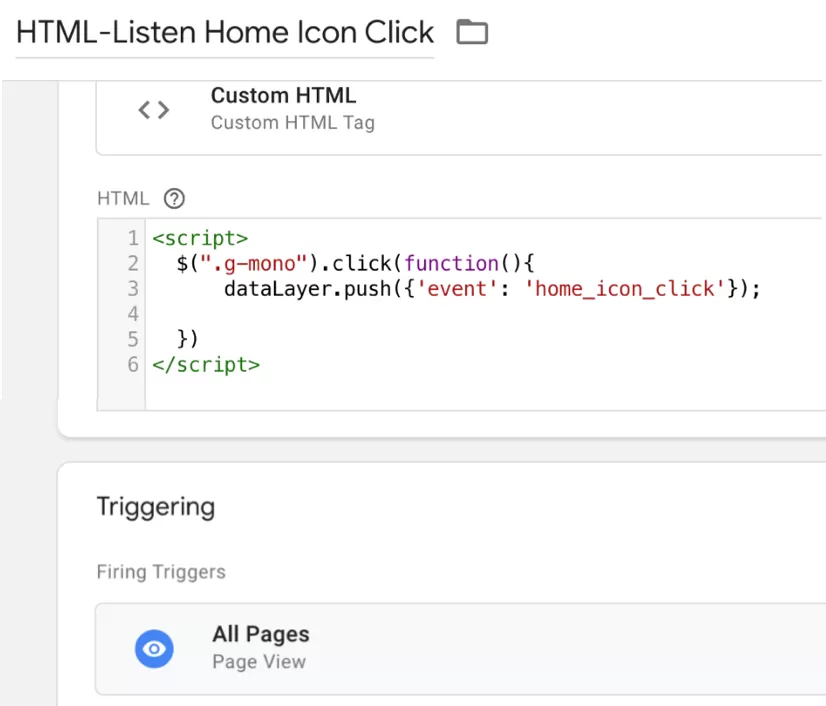
Paste the following code:
<script>
  $(".g-mono").click(function(){
      dataLayer.push({'event': 'home_icon_click'});

  })
</script>
Now, whenever someone clicks an element with the class `g-mono`, jQuery will push a custom event into the data layer.
Important: Replace `.g-mono` with the actual class or selector of the element you want to track.
Step 3: Create a Custom Event Trigger
Next, we need GTM to listen for that custom event.
In GTM , click「Triggers」——「New」——「Choose a trigger type to begin setup…」——「Custom Event」,Name it “Home Icon Click”, and make the following settings:
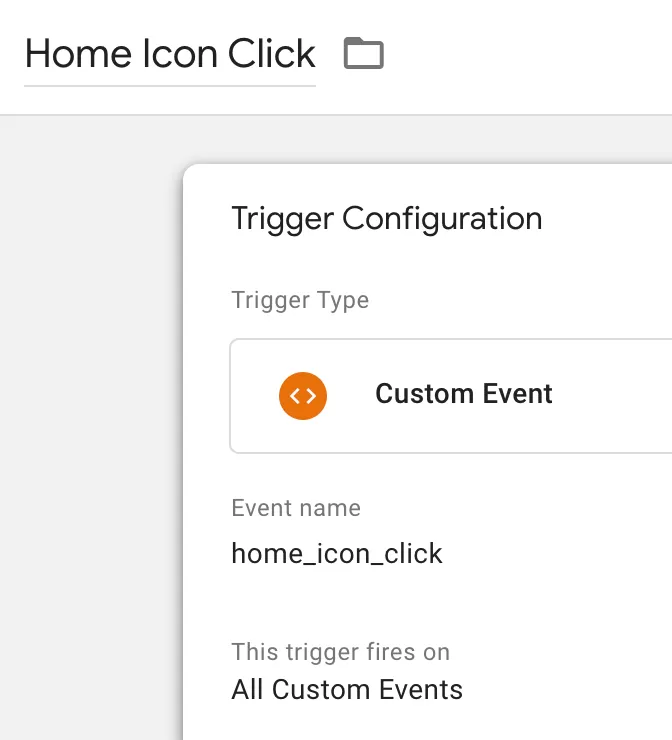
This ensures GTM only fires when our jQuery listener has done its job.
Step 4: Create GA4 Event Tag
Now send the event to GA4.
In GTM , click「Tags」——「New」——「Choose a tags type to begin setup…」——「Google Analytics: GA4 Event」,Name it “GA4-Event-Home Icon Click”, and make the following settings:
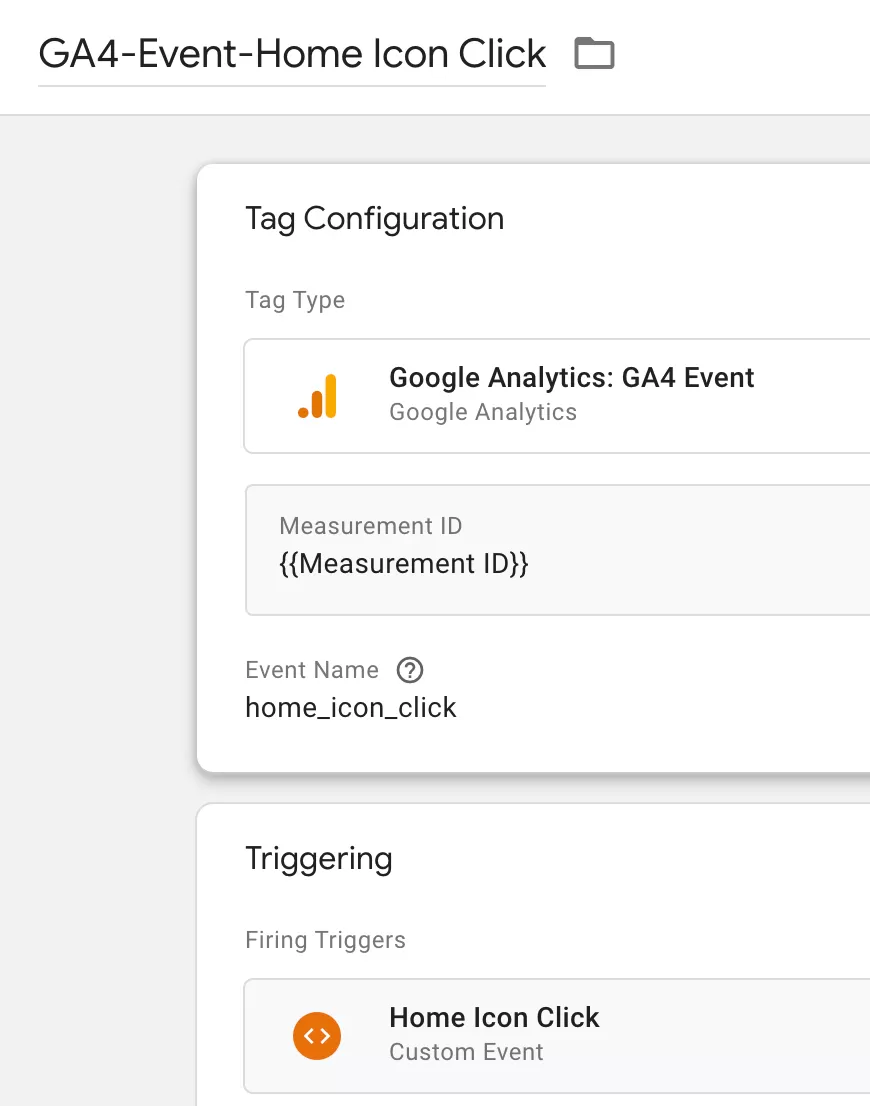
That’s it. The chain is complete: jQuery listens → dataLayer pushes → GTM catches → GA4 receives.
Step 5: Test Using GTM Preview Mode
Before publishing, let’s make sure everything works.
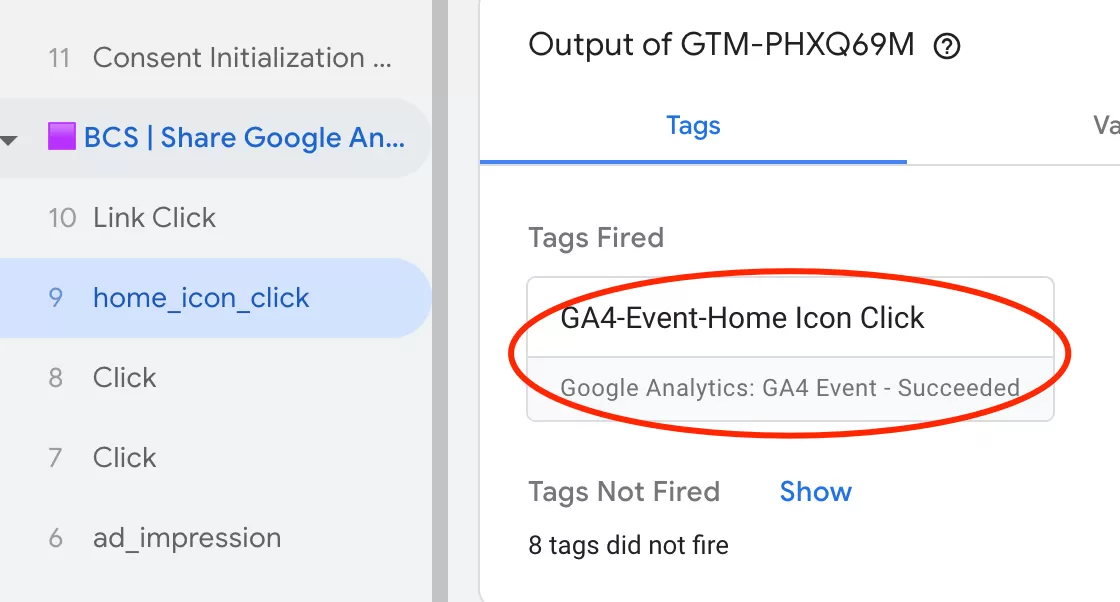
If both tags fire, you’re good to publish.
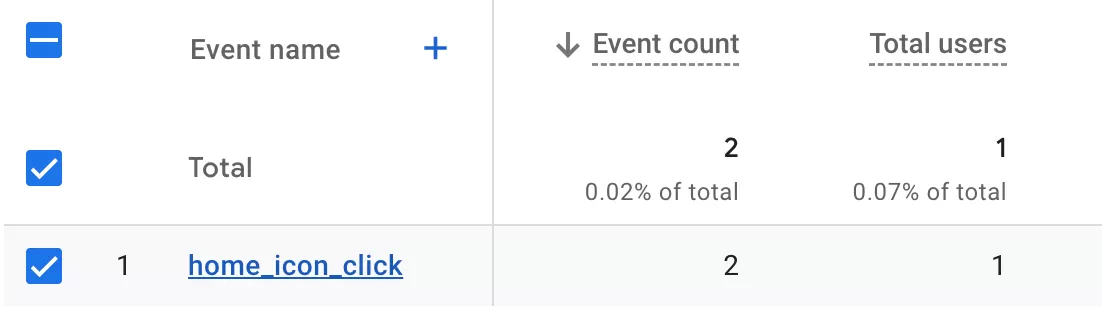
Step 6 : Verify Data in GA4 Reports
After publishing, it typically takes up to 24 hours before the event appears in your GA4 reports. Once it does, you can verify it in Evebt Reports:
Final Words
Using jQuery for custom event tracking gives you a level of precision that GTM’s built-in triggers sometimes can’t match. When you’re dealing with elements that don’t have clean IDs or unique attributes, a jQuery listener combined with `dataLayer.push()` is a reliable fallback that works.
Here’s a quick recap of the workflow:
- Use Chrome DevTools to find a stable CSS selector for your element
- Create a Custom HTML tag in GTM with a jQuery click listener
- Create a Custom Event trigger to catch the pushed event
- Create a GA4 Event tag to send the data to GA4
- Test in Preview mode before publishing
- Verify in GA4 after 24 hours
I hope this guide helped you understand how to use jQuery for GA4 event tracking. If you have questions or ran into issues during implementation, feel free to leave a comment and I’ll do my best to help.