Update time: March 16, 2026
You’ve probably heard about the growing concerns about how increasing privacy restrictions and blockers make it harder to collect accurate analytics data. Safari blocks third-party cookies. Firefox does too. Even Chrome is slowly moving in that direction. And every time a browser updates its tracking protections, a little more of your GA4 data slips through the cracks.
Google has given us tools to deal with this, like server-side tagging and Google Tag Gateway. But where should you start?
If you’ve read about Google Tag Gateway (formerly called First-Party Mode) but weren’t sure what it actually does or how to set it up, you’ve come to the right place. This guide walks through what it is, why you’d use it, and how to configure it on Cloudflare step by step.
Let’s get into it.
What is Google Tag Gateway?
Google Tag Gateway is the new name for First-Party Mode (FPM). It allows your website to load the GTM script from your own domain and send analytics requests to GA4 through your domain before forwarding them to Google’s servers.
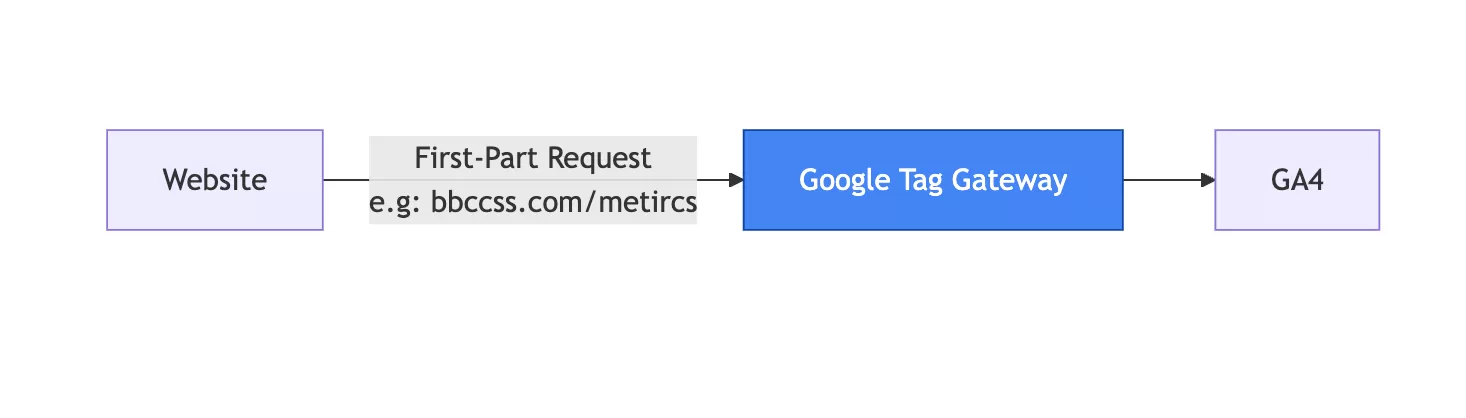
From the browser’s perspective, these requests appear to be first-party requests originating from your own domain — not third-party requests going to google-analytics.com. That’s the whole point. Browsers are far less likely to block requests that look like they’re going to your own server.
If you’ve worked with Adobe Analytics before, this will sound familiar — Adobe calls a similar setup “CNAME deployment.” Same concept, different name.
What You’ll Need Before Starting
Two things are required:
- A Google tag or Tag Manager container already installed on your site. Tag Gateway doesn’t set up tracking from scratch — it only changes how the existing tracking communicates with Google’s servers.
- A CDN or Load Balancercapable of forwarding requests to external endpoints. Google Tag Gateway has native integrations with Cloudflare and Akamai, which makes setup significantly easier. If you use a different CDN, you can still make it work, but you’ll need to configure the forwarding rules manually.
For this guide, I’ll focus on the Cloudflare setup since that’s what I’ve tested most extensively.
Advantages and Disadvantages
I’ve run Google Tag Gateway across several properties, and here’s my honest assessment.
Advantages
- Privacy Compliance: First-party cookies are less likely to be blocked by browsers like Safari and Firefox, improving tracking reliability.
- Longer Cookie Lifespan: Cookies set in a first-party context are less affected by browser privacy restrictions, allowing longer user identification periods compared to traditional third-party setups.
- Enhanced Trust: Because the tracking requests originate from your own domain, data collection appears more transparent and consistent with user expectations around privacy.
Disadvantages
- DNS Configuration Required: Setting up Google Tag Gateway requires configuring DNS records (CNAME) and traffic routing, which may involve additional infrastructure changes.
CloudFlare Setup Example (Step by Step)
Before starting the setup:
- Your website must already be using Cloudflare CDN
- The GA4 administrator account and the Cloudflare administrator account should belong to the same user
There are two ways to find the setup interface:
- From GTM,click「Admin」——「Google tag gateway」
- From GA4,In the GA4 Web stream details,click「Configure tag settings」——「Admin」——「Google tag gateway」

Either way, you’ll land on the Google Tag Gateway configuration screen. Click「Continue」 to start.
Step 1:Your Google tag will be updated
In this step, you define the URL path that will be used for loading the GTM script and sending GA4 data. For example, you can set the path to /gtm.

This means both the GTM script and analytics requests will be routed through yourdomain.com/gtm instead of googletagmanager.com or google-analytics.com. Pick a path that makes sense for your domain structure — I usually use something short like /gtm or /tag.
Step 2: Connect Your Cloudflare Account
Next, connect your Cloudflare account. 
After logging in, you’ll be asked to authorize access. Click Allow to grant permission.

Once authorized, you’ll be redirected back and see a confirmation that the Cloudflare connection was successful. This step is straightforward — the OAuth flow handles everything.

Step 3: Activate Your Website Domain
Now select the Cloudflare domain where Google Tag Gateway will be enabled. If you have multiple domains in Cloudflare, make sure you pick the right one.

After selecting the domain, click 「Complete Setup」.
Step 4: Update the GTM Script on Your Website
This is the step most people forget. The GTM snippet already installed on your site points to googletagmanager.com. You need to update the script URL to match the custom path defined in Step 1.
Step 5:Test and Verify
Open your browser’s developer tools and go to the Network tab, filter by GTM, you can see that the GTM tracking code is loaded from your own domain:
The data is sent to your own domain:

If both are showing up, Google Tag Gateway is working correctly.
Google Tag Gateway vs Server-Side Tagging vs Client-Side Tagging
A common question I get is: “Should I use Google Tag Gateway or server-side tagging?”
They’re not the same thing, and they’re not mutually exclusive. Here’s the quick comparison:
| Client-Side Tagging | Google Tag Gateway | Server-Side Tagging | |
|---|---|---|---|
| Where tags run | Browser | Browser (routed through your domain) | Your server |
| Cookie type | Third-party | First-party | First-party (HttpOnly) |
| Bypasses ad blockers? | No | Partially | Yes |
| Complexity | Low | Medium | High |
I won’t go deep into all three here — I’ve written a separate comparison here that covers SST, CST, and FPM in detail.
Final Words
Google Tag Gateway is a relatively straightforward way to improve tracking reliability without the complexity of a full server-side tagging setup. If you’re already on Cloudflare or Akamai, the setup takes about 15 minutes, and the benefit — fewer blocked requests, longer cookie lifespans — is immediate.
But I should be clear: it’s not a silver bullet. Some browser extensions and ad blockers will still block requests even when they go through your own domain. I’ve seen cases where DuckDuckGo’s browser blocks Tag Gateway traffic, for example, while other extensions let it through. So think of it as a meaningful improvement, not a complete solution.