Update time: June 26, 2025
What is a Single Page Application (SPA)
A Single Page Application (SPA) is a web application where all necessary HTML, JavaScript, and CSS code is fetched at once when first loaded, or content is loaded dynamically based on user interaction without reloading the entire page. SPA implements dynamic content updates through JavaScript frameworks (such as React, Angular, Vue.js, etc.), and usually relies on the browser History API or DocumentFragment to manage page state and URL changes.
In traditional websites, each page load triggers the page_view event of GA4, but in SPA, since the page does not refresh, GA4 requires additional configuration to correctly record “virtual page views” and other user interactions.
Challenges of GA4 tracking SPA
Common tracking issues faced by GA4 in SPA include:
- Page views not recorded: Since the page does not reload, GA4’s default page_view event may only be triggered on the first load, and subsequent changes to the page content will not be automatically recorded.
- Inaccurate URLs and Page Titles: SPAs may update URLs through pushState, but GA4 uses document.location.pathname by default, which may not capture the full URL or correct page title.
- Rogue Referral: If not configured correctly, SPAs may cause session data to be broken or referrer data to be incorrect, affecting user journey analysis.
- Event duplication or omission: Automatic tracking (such as enhanced measurement) may cause page view events to be counted repeatedly or fail to trigger in some cases.
How to determine whether your website is SPA
You can click to visit page B from page A in the preview mode of GTM, and see whether Tag Assistant reloads the page during this process. If it reloads, then it is not a single-page application. If it does not reload and a lot of “History” appears, it is a single-page application.
Before previewing, you need to open this trigger condition first. In GTM , click「Triggers」——「New」——「Choose a trigger type to begin setup…」——「History Change」,Name it “History Change “, and make the following settings: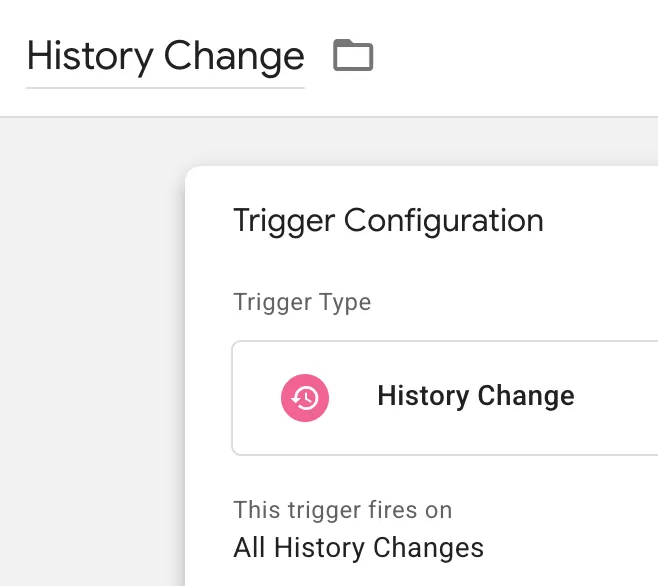
Then click Preview, click on any page, and see the Tag Assistant:
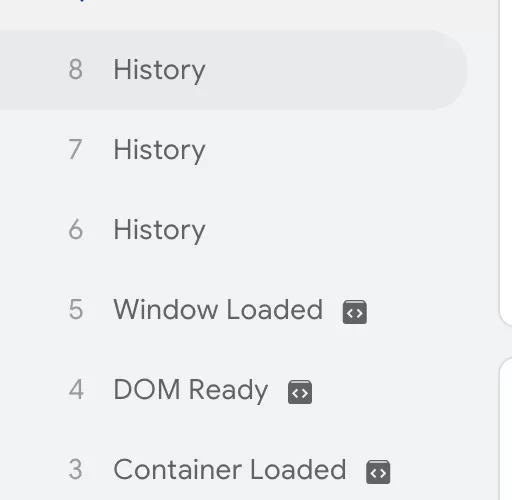
If “History” appears in Tag Assistant, it means it is a single-page application.
Method 1:Enhanced Measurement
GA4’s Enhanced Measurement feature is one of the easiest ways to track SPAs.
It is enabled by default and automatically captures events such as page views, scrolls, clicks, file downloads, etc. For SPAs, Enhanced Measurement detects URL changes by listening to the browser’s History API (pushState and replaceState) and triggers a page_view event.
Check Whether it is enabled
Click “Enhanced Measurement” in the Web stream details:

Click “Show advanced settings ” and check “Change pages based on browser history time”:
Key Takeaways
- Advantages
- Easy to Implement: No additional coding or custom setup is required.
- Disadvantages
- Potentially Inaccurate URLs and Page Titles:Single Page Applications (SPAs) often update URLs using pushState. However, GA4 relies on document.location.pathname by default, which may not always capture the full URL or the correct page title.
- Recommended Use Cases
Method 2:History Change
When Enhanced Measurement does not meet your needs, you can use Google Tag Manager (GTM)’s History Change trigger to track SPA page views. The History Change trigger listens to the browser’s popstate event or the URL change of the History API, triggering the GA4 page_view event.
Step 1:Set Up the Trigger(History Change)
In GTM , click「Triggers」——「New」——「Choose a trigger type to begin setup…」——「History Change」,Name it “History Change “, and make the following settings:
Then click Preview, click on any page, and see the Tag Assistant:
Step 2:Set Up the Data Layer Variable
Click 「History」, then look at the information in API Call, mainly find oldUrl and newUrl: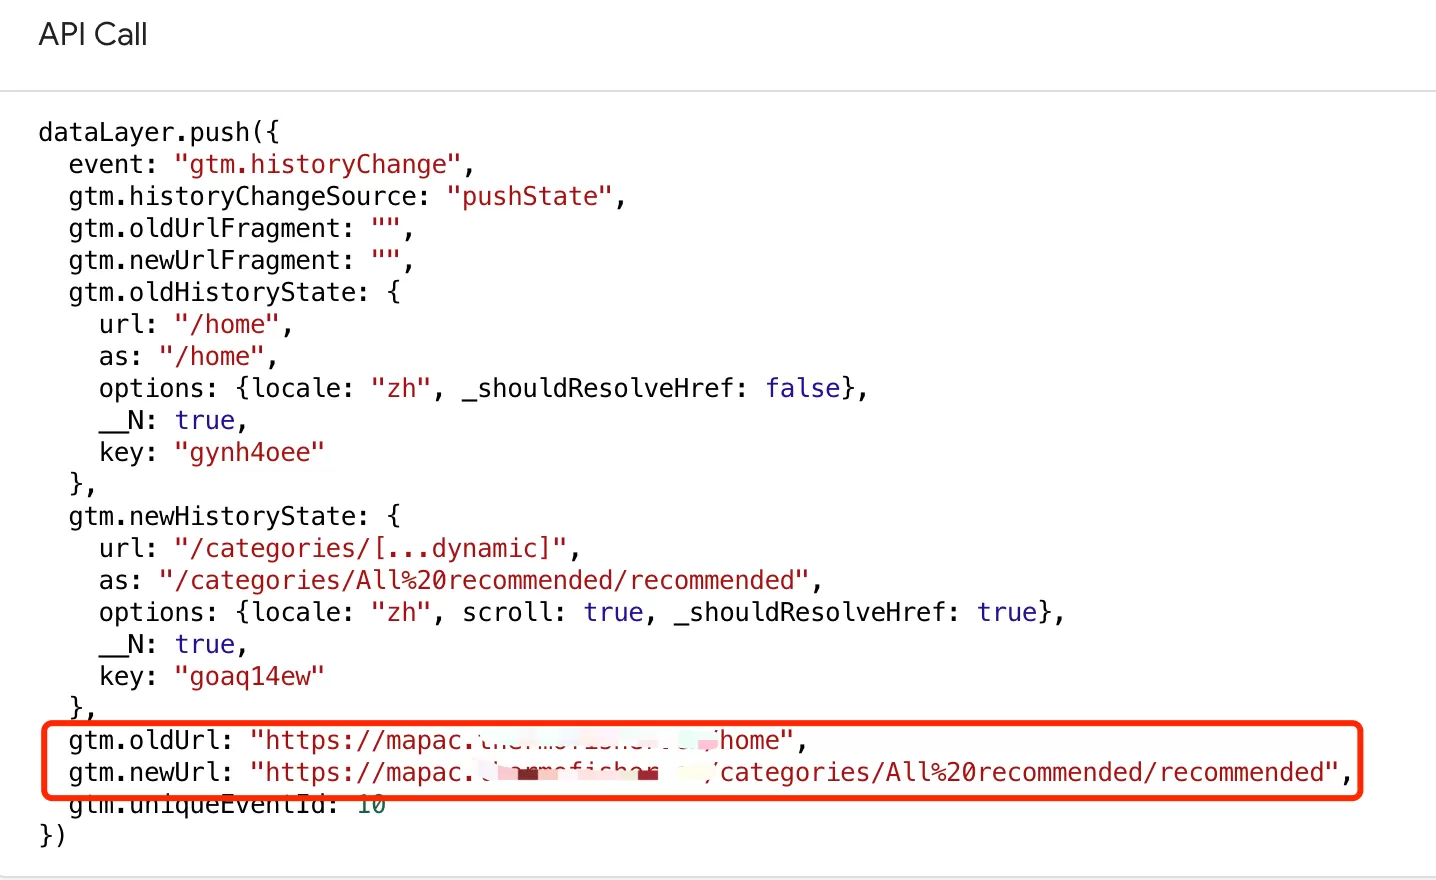
oldUrl is the previous page, which is the Referral, and newUrl is the current page, which needs to be obtained using Data Layer Variable.
In GTM, click「 Variables」——「New」——「Choose a variable type to begin setup…」——「Data Layer Variable」, name it “dlv-oldUrl”, and then set as follows:
Use the same method to set dlv-newUrl:
Step 3:Set Up the Tag
We first need to set up a Google Tag. There is no need to set trigger conditions.
In GTM , click「Tags」——「New」——「Choose a tags type to begin setup…」——「Google Analytics」——「Google Tag」,Name it “GA4 update”, and make the following settings:

Note: This tag does not require a trigger condition.
In GTM , click「Tags」——「New」——「Choose a tags type to begin setup…」——「Google Analytics」——「Google Analytics: GA4 Event」,Name it “GA4-Page View Event”, and make the following settings:
GA4 update is triggered before GA4-Page View Event and is mainly used to update configuration parameters:
How to Track Normal Page Loads
If normal page loads do not trigger “History”, then you need to configure a separate Google Tag to track, just the normal GA4 page tracking, such as:

If a normal page load triggers “History”, then the normal page will be merged into the GA4-Page View Event to trigger tracking, but we still need to trigger the Google Tag, load the basic configuration, but do not send the page_view event, just set send_page_view to false:
Key Takeaways
- Advantages
- Greater Flexibility: Allows you to set custom page_location and page_referrer, making it ideal for complex Single Page Applications (SPAs).
- Minimal Development Effort: Only requires configuration in GTM; no need to modify the website code.
- Disadvantages
- Potentially Inaccurate URLs and Page Titles: SPAs often update URLs via pushState, but GA4 defaults to document.location.pathname, which may not always capture the full URL or correct page title.
- Recommended Use Cases
Method 3:Delayed Send(History Change&dataLayer.push)
Delayed sending is an optimization of Tracking Single Page Applications (SPA) with History Change, which can solve the problem of inaccurate URL and page title.
The idea is to delay 500ms when loading the page/History Change, wait for the page to open, and then execute js to obtain the accurate Page URL and Page Title of the current page, and then send it out through dataLayer.push.
Step 1:Set Up the Trigger(History Change)
In GTM , click「Triggers」——「New」——「Choose a trigger type to begin setup…」——「History Change」,Name it “History Change “, and make the following settings:
Then click Preview, click on any page, and see the Tag Assistant:
Step 2:Set Up Delayed Send
In GTM , click「Tags」——「New」——「Choose a tags type to begin setup…」——「Custom HTML」,Name it “SPA-Delayed Send”, and make the following settings:

The purpose of this configuration is to delay when History Change occurs, ensure that the new page is opened, obtain the accurate webpage title, and then send the data through dataLayer.push.
Step 3:Set Up the Data Layer Variable
In GTM, click「 Variables」——「New」——「Choose a variable type to begin setup…」——「Data Layer Variable」, name it “dlv—pagePath”, and then set as follows:
Use the same method to set dlv-pageTitle and dlv-pageUrl.
Step 4:Set Up the Custom Event
In GTM , click「Triggers」——「New」——「Choose a trigger type to begin setup…」——「Custom Event」,Name it “Custom Event—Pageview “, and make the following settings:
Step 5:Set Up the Tag
We first need to set up a Google Tag. There is no need to set trigger conditions.
In GTM , click「Tags」——「New」——「Choose a tags type to begin setup…」——「Google Analytics」——「Google Tag」,Name it “GA4 update”, and make the following settings:

Note: This tag does not require a trigger condition.
In GTM , click「Tags」——「New」——「Choose a tags type to begin setup…」——「Google Analytics」——「Google Analytics: GA4 Event」,Name it “GA4-Page View Event”, and make the following settings:
GA4 update is triggered before GA4-Page View Event and is mainly used to update configuration parameters:
Key Takeaways
- Advantages
- Greater Flexibility: Supports custom page_location and page_referrer, making it well suited for complex Single Page Applications (SPAs).
- Low Development Overhead: Requires configuration in Google Tag Manager only—no changes to the website’s source code are needed.
- Disadvantages
- Risk of Data Loss: If the delay is set too long, users may leave the page or navigate again before the event is sent, resulting in missed data. If the delay is too short, issues with inaccurate URLs and page titles may still occur.
- Recommended Use Cases
Method 4:dataLayer.push
For complex SPAs or applications that do not rely on the History API, the most reliable tracking method is for developers to help push custom events through the dataLayer.push method.
Developers can actively push page_view events to the data layer when the SPA‘s route changes or content is updated, and GTM will trigger GA4 tags based on these events.
Step 1:dataLayer.push sends data
The data structure sent by the page is as follows. Each page needs to be sent in this way. This step needs to be implemented by the developer:
<script>
 window.dataLayer = window.dataLayer || [];
 window.dataLayer.push({
 'event': 'Pageview',
 'pageUrl': 'https://www.example.com/something/contact-us',
 'pagePath': '/something/contact-us',
 'pageTitle': 'Contact us'
 });
</script>
Step 2:Set Up the Data Layer Variable
In GTM, click「 Variables」——「New」——「Choose a variable type to begin setup…」——「Data Layer Variable」, name it “dlv—pagePath, and then set as follows:
Use the same method to set dlv-pageTitle and dlv-pageUrl.
Step 3:Set Up the Triggers
In GTM , click「Tags」——「New」——「Choose a triggers type to begin setup…」——「Custom Event」,Name it “Custom Event—Pageview”, and make the following settings:

Step 4:Set Up the Tag
In GTM , click「Tags」——「New」——「Choose a tags type to begin setup…」——「Google Analytics」——「Google Tag」,Name it “GA4 Basic Tracking”, and make the following settings:

Key Takeaways
- Advantages
- Maximum Flexibility and Accuracy: Provides full control over tracking logic, enabling highly accurate data collection for complex Single Page Applications (SPAs).
- Disadvantages
- High Development Effort: Requires significant development resources and close collaboration with the engineering team.
- Recommended Use Cases
Summary
| Method | Advantages | Disadvantages | |
| Method 1:Enhanced Measurement | Easy to use: No additional coding required. | Inaccurate URLs and Page Titles | |
| Method 2:History Change | No need for extensive development work | Inaccurate URLs and Page Titles | |
| Method 3:Delayed Send(History Change&dataLayer.push) | No need for extensive development work | Data loss | |
| Method 4:dataLayer.push | Greater flexibility and accurate data tracking. | Requires a lot of development work | Most recommended |