Update time: January 13, 2025
If you’re trying to track form submissions in GA4, you’ve probably noticed there’s no single “right way” to do it. Enhanced Measurement, GTM triggers, custom events, dataLayer pushes — the options can be overwhelming, and choosing the wrong one wastes time and gives you unreliable data.
In this guide, I’ll walk through each method, when it works, when it doesn’t, and which one I’d recommend for different situations.
Enhanced Measurement: Form Interactions
GA4’s Enhanced Measurement comes with built-in form tracking. When enabled, it automatically captures form_start and form_submit events.
- form_start: the first time a user interacts with a form in a session
- form_submit: when the user submits a form
To turn it on, go to your Web stream details, click Enhanced Measurement, and check Form interactions.

Advantages: Just check the box to turn it on, the setting is very convenient.
Here’s the catch:If your site has Facebook Pixel with Facebook event tracking, it can trigger false form_submit events. I’ve seen this cause inflated numbers on several sites.
Verdict: Great for simple sites without Facebook Pixel.
GTM Form Submission Trigger
Built-in GTM trigger for form submissions. Easy to configure, no custom code.
Before You Start: Form Requirements
Before GTM can track a form submission, your page’s HTML needs to meet two requirements:
- The HTML must include a
<form>tag. Both the browser and GTM’s trigger need this to recognize the element as a form. - There must be at least one
<input>or<button>element with itstypeattribute set tosubmit. This is what users click to submit the form.
If either condition isn’t met, the Form Submission trigger won’t work. So before diving into GTM, check your form’s code structure first.
Let’s look at a real example — the subscription form on my blog.
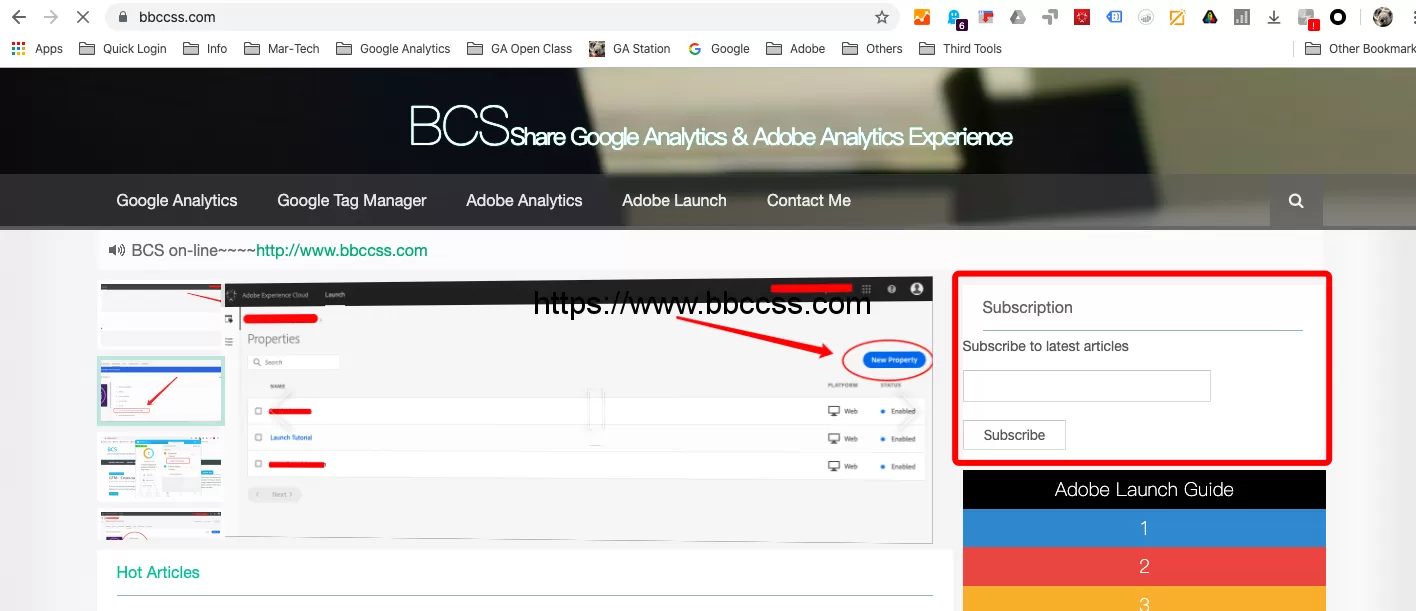
Step 1: Enable Built-In Variables
GTM comes with built-in variables specifically for form tracking. You just need to enable them.
In GTM , click「Variables」——「Configure」,Check these Built-In Variables of click:
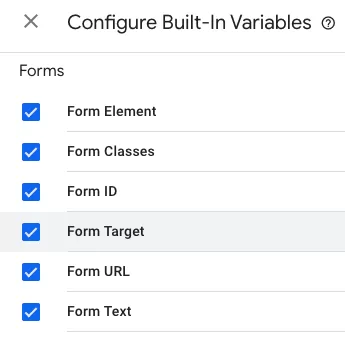
If you’ve already enabled these, skip this step. If not, go ahead and check them now — you’ll need them later.
Step 2: Set Up the Form Submission Trigger
In GTM,click「Triggers」——「New」——「Choose a trigger type to begin set-up」——「Form Submission」,name it “Form Submitted-Subscription”, and make the following settings:
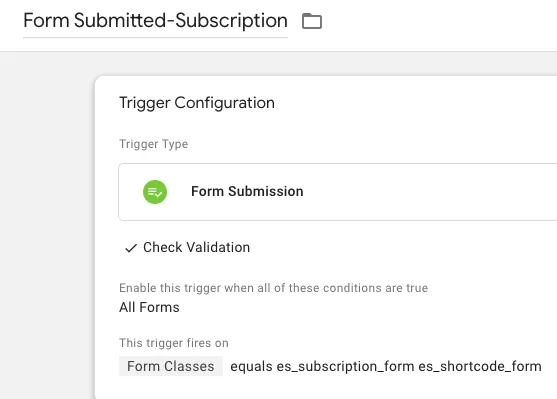
You’ll see two configuration options. Let me explain what each one does:
- Wait for Tags :When enabled, this delays the form submission until all dependent tags have fired — or until a 2000ms timeout is reached. Useful if you have other tags that need to fire before the form submits. For simple GA4 event tracking, you usually don’t need it.
- Check Validation:This option is supposed to fire the trigger only when the form successfully passes validation and submits. In theory, that sounds useful.
Here’s the catch: In practice, checking this option often breaks the trigger entirely. I’ve tested this extensively, and the trigger simply doesn’t fire — whether the form validates or not. I honestly can’t recommend using it.
So leave Check Validation unchecked, and keep Wait for Tags unchecked too unless you have a specific reason to use it.
Step 3: Create the GA4 Event Tag
In GTM , click「Tags」——「New」——「Choose a tag type to begin set-up」——「Google Analytics: GA4 Event」,named “ Event-Subscription”, and make the following settings:
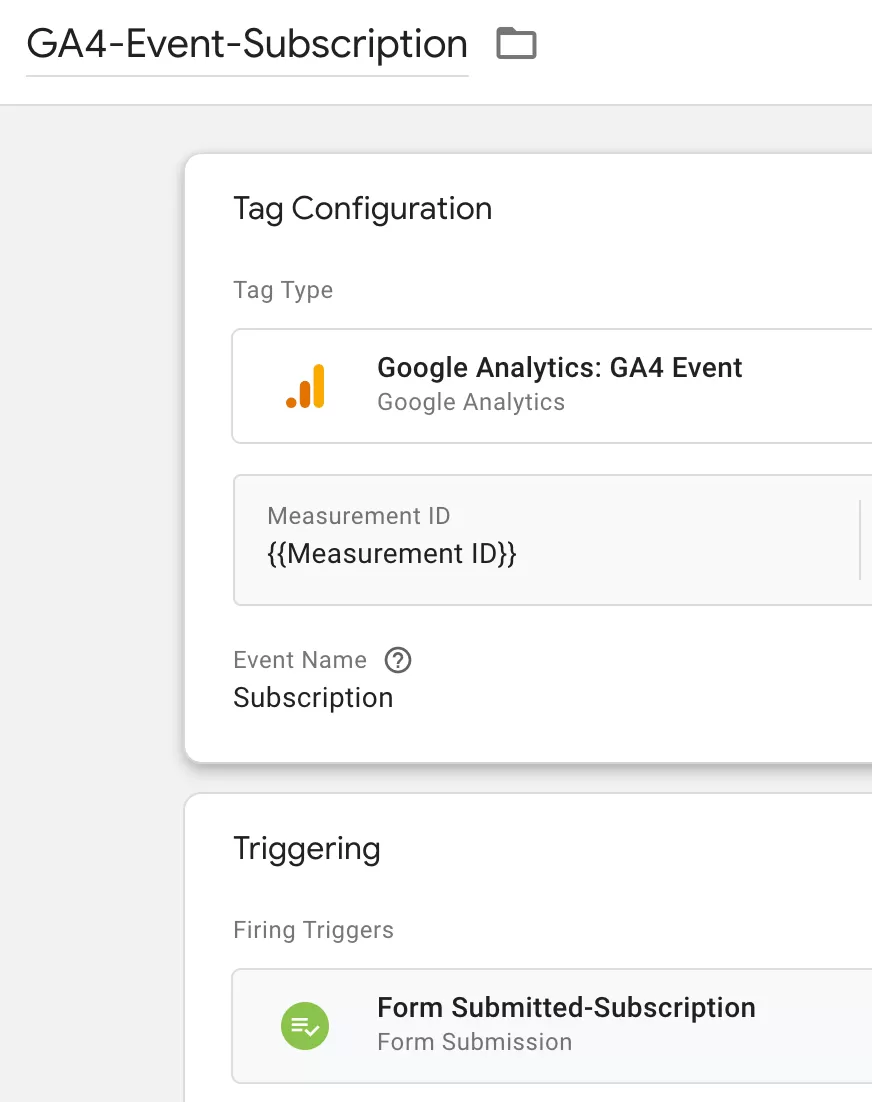
Optionally, add event parameters like {{Form ID}} or {{Form Text}} using the built-in variables from Step 1.
Save the tag — GTM side is done.
Step 4 : Preview and Publish
Click Preview in GTM, navigate to your form page, fill it out, and submit. In Tag Assistant, you should see:
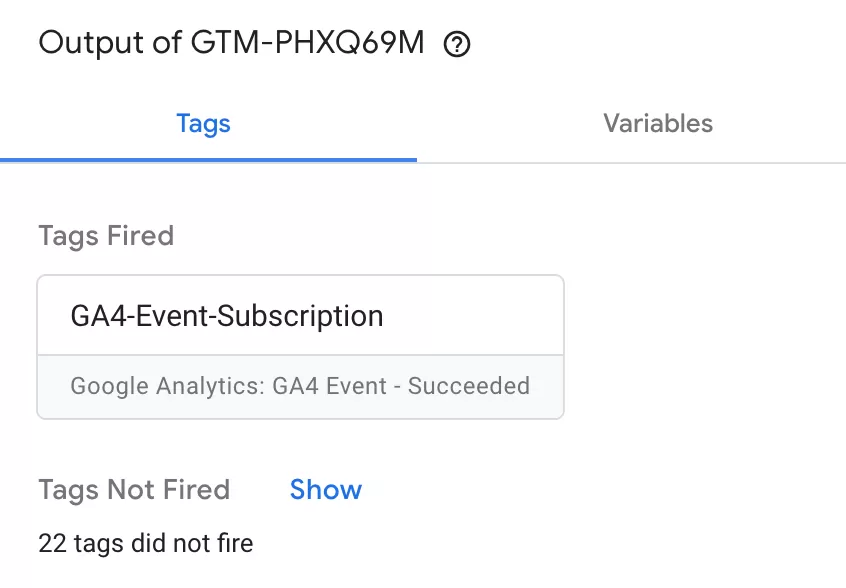
Once everything works, create a new version and publish.
Step 5 : Verify Data in GA4 Reports
After publishing, give it about 24 hours — the typical delay before custom events appear in standard GA4 reports. Then find the subscription event in Event Reports:
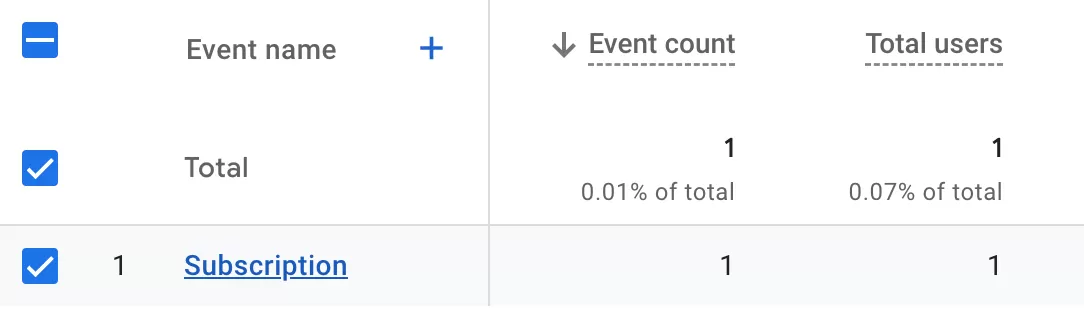
Here’s the catch: Your form needs a <form> tag and a <button type="submit">. If developers use <div> elements styled as buttons, this trigger silently fails.
Verdict: Best for standard HTML forms with proper markup.
GTM Element Visibility Trigger
Fires when a success message or confirmation element becomes visible after form submission.
Let’s put this into practice. Suppose I want to track submissions on a Contact Form 7 form at https://www.bbccss.com/contact-form-7.
When the form is submitted successfully, a confirmation message appears:
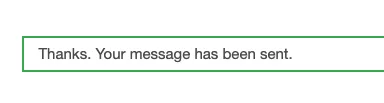
Step 1 : Set Up the Trigger
First, I need to find the element that contains the success message. Right-click the message, inspect the element, and look for a class or ID we can use
In this case, the success message has a class: `wpcf7-response-output`. Since this class is inside a `div`, I’ll use the CSS selector `div.wpcf7-response-output`.
In GTM , click「Triggers」——「New」——「Choose a trigger type to begin setup…」——「Custom Event」,Name it “Element Visibility—Submit Form”, and make the following settings: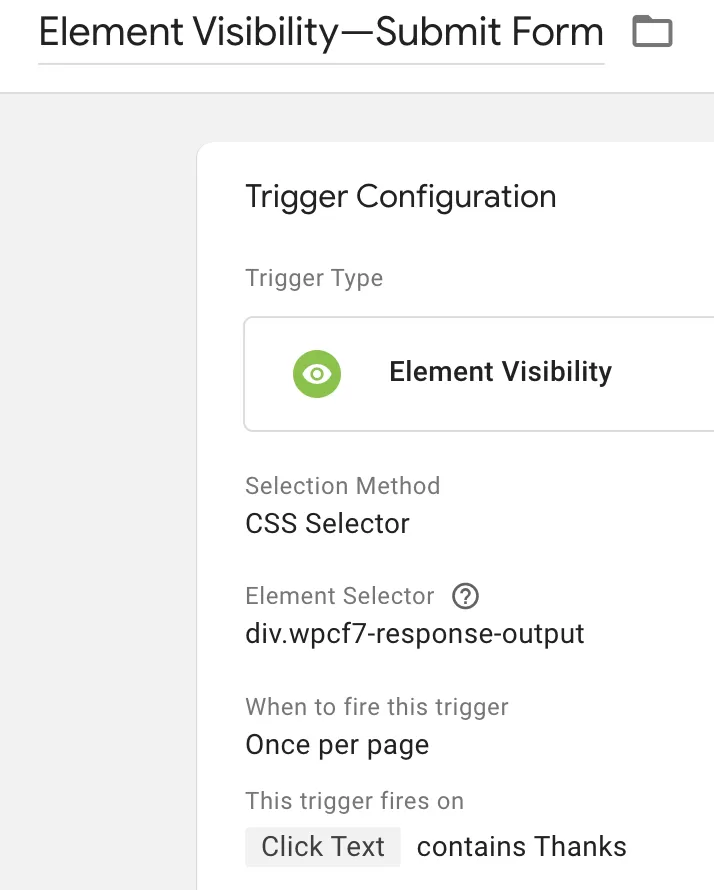
To make sure the trigger only fires when the form was actually submitted successfully (not just when the element appears for some other reason), I’ll add a text condition: the trigger should only fire when the message contains the word “Thanks.”
Step 2 : Set Up the GA4 Event Tag
Now let’s create the tag that sends the event to GA4.
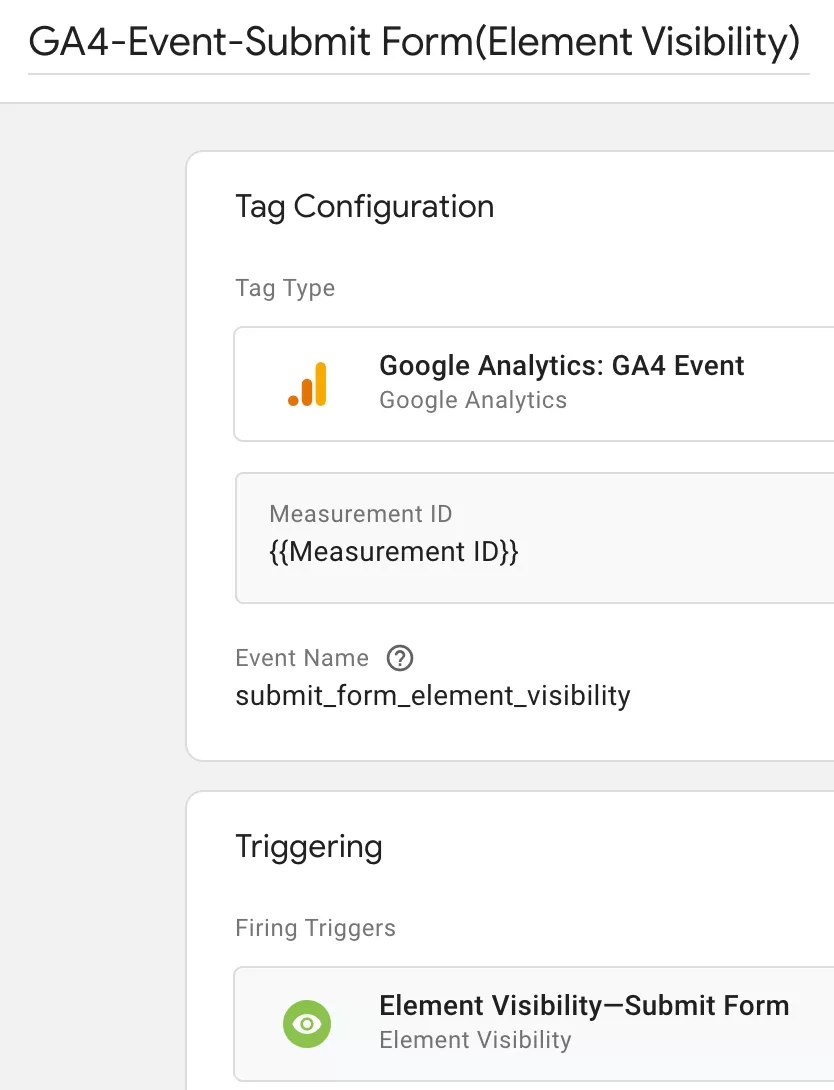
In GTM , click「Tags」——「New」——「Choose a tags type to begin setup…」——「Google Analytics: GA4 Event」,Name it “GA4-Event-Submit Form(Element Visibility) “, and make the following settings:
Step 3 : Preview and Publish
Before publishing, test in GTM Preview mode. Submit the form on your test page and check that the `GA4-Event-Submit Form (Element Visibility)` tag fires when the success message appears.
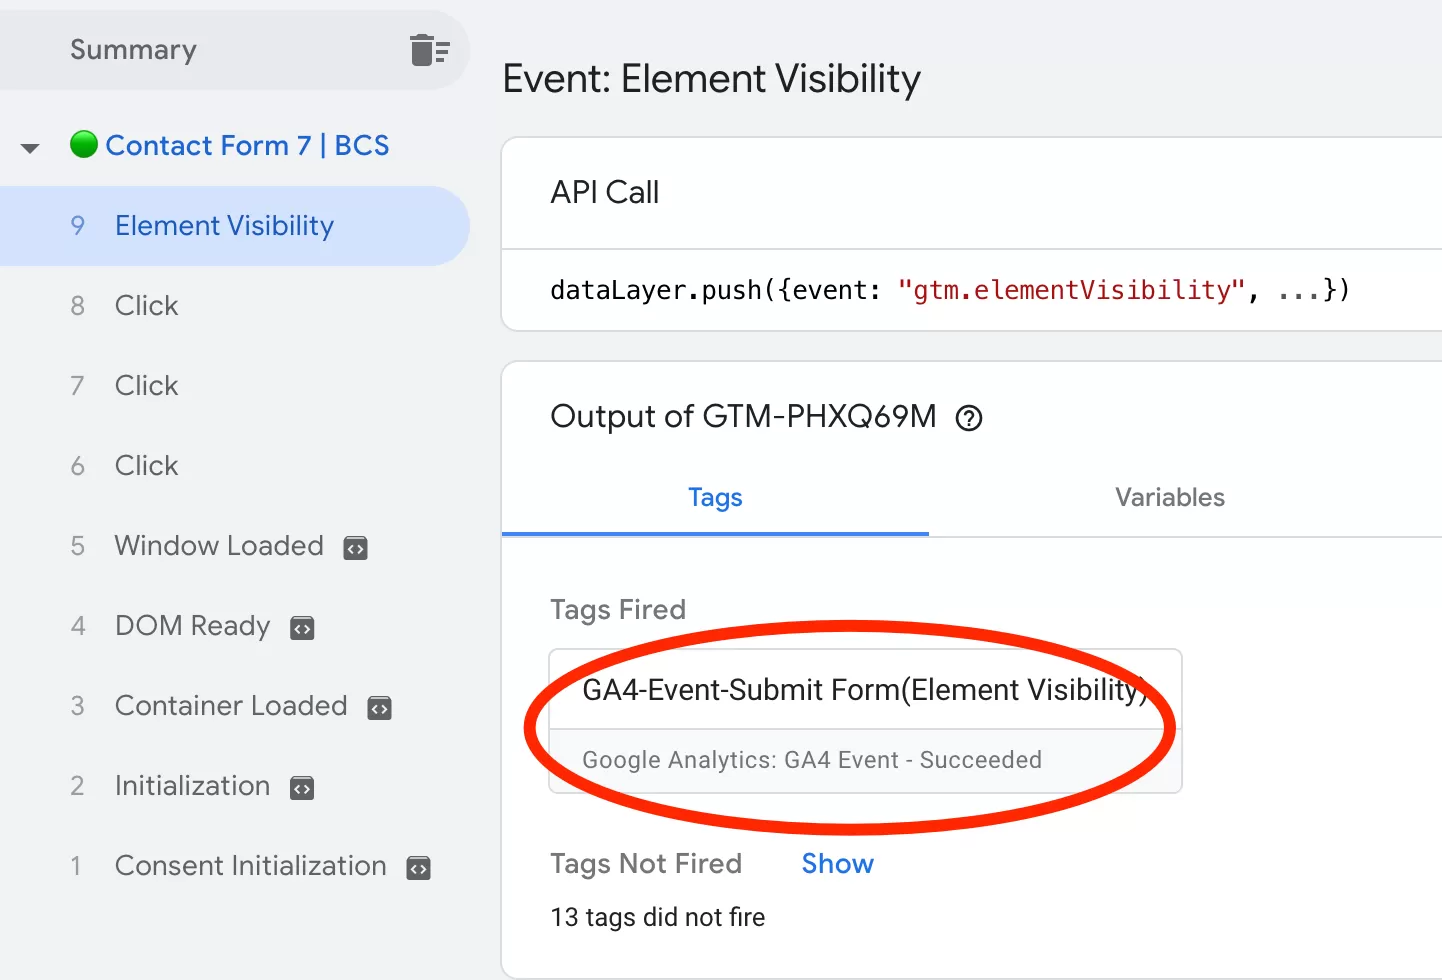
If everything looks correct, publish your container.
Step 4 : Verify Data in GA4 Reports
After publishing, GA4 typically takes up to 24 hours to process and display new events. Once the data is available, look for `submit_form_element_visibility` in your Events report.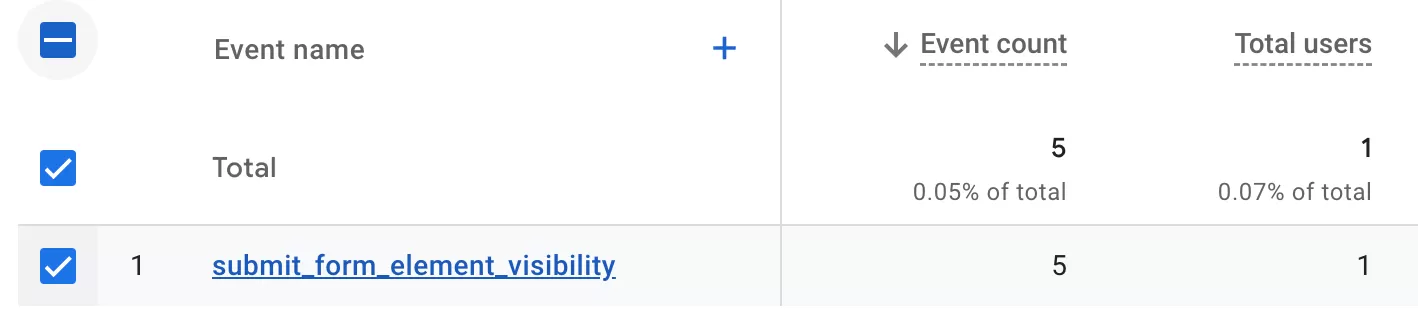
Here’s the catch: Only works if there’s a reliably detectable element that appears only on success.
Verdict: Good for popup forms with success messages. Not a general-purpose solution.
Page View: Thank You Pages
Track form submissions via a thank you page URL. Dead simple. This can be achieved directly through GA4’s create event.
Here’s the catch: Page refreshes cause duplicates. Only works if your form redirects — useless for AJAX forms.
Verdict: Works for traditional forms with dedicated redirect pages.
Third Party Form
Klaviyo, Gravity Forms, and Contact Form 7 all fire custom DOM events you can listen for. I’ve written detailed guides for each.
- Form Tracking for Klaviyo Forms on Google Tag Manager
- Form Tracking for Gravity Forms on Google Tag Manager
- Form Tracking for Contact Form 7 on Google Tag Manager
Here’s the catch: Relies on addEventListener / jQuery — older browsers won’t be tracked.
Verdict: The right approach for any third-party form plugin.
dataLayer.push
Push a custom event directly to the data layer from your form’s submission handler.
<span style="font-size: 12pt;">dataLayer.push({
   'event': 'submit_form',
   'form_id': 'demo_request',
   'form_message': 'error'
});
</span>
Here’s the catch:Requires dev support to add the dataLayer.push() call.
Verdict: Gold standard for accuracy when you have dev resources.
Custom Events: Click Tracking Fallback
Track clicks on the submit button instead of actual submissions.
Here’s the catch: Least accurate — clicks don’t mean the form actually submitted. You’ll get false positives.
Verdict: Better than nothing, but treat the data as directional.
Final Words
| Situation | Recommended method |
|---|---|
| Simple site, no FB Pixel | Enhanced Measurement |
| Standard HTML forms | Form Submission Trigger |
| Forms with visible success messages | Element Visibility |
| Dedicated thank you page | Page View |
| Third-party form plugins | Plugin-specific DOM events |
| Custom forms with dev support | dataLayer.push |
| No other option works | Click-based fallback |